Important Articles
Here are two articles on doing your nails.
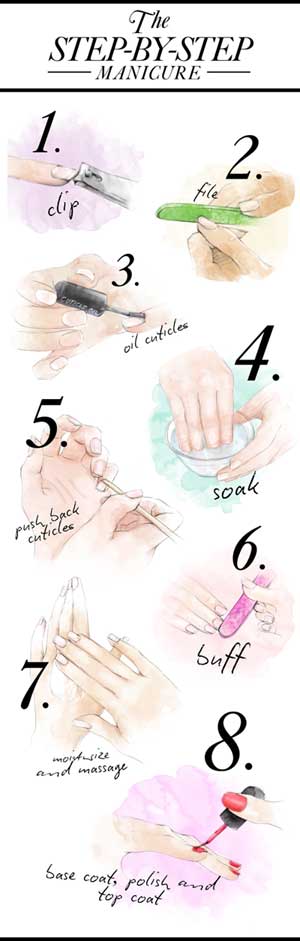
The Perfect DIY ManicureThis article comes from a beauty website to which I subscribe: Before You BeginSay your goodbyes to last week's polish shade and take it all off. Always start with polish remover. Pure acetone nail polish remover makes removal super easy. Glitter doesn't even stand a chance. Even if you don't have polish on your nails, prep the nail bed with polish remover before applying your first coat. Using nail polish remover, even on clean nails, is key to removing natural oils and ensuring a long-lasting manicure. . Step 1: Trim Your NailsFirst, if your nails are too long for your liking, give them a little trim using a nail clipper. Step 2: File and ShapeOnce you have your desired length, file and shape your nails. Step 3: Apply Cuticle OilApply a healthy dose of cuticle oil and/or remover at the rim of the nail. Step 4: SoakSoak your hands in a bowl of warm water for a minute or two to soften your cuticles. You can even add some moisturizing soap into the bowl. Step 5: Push Back & Cut CuticlesUsing a cuticle pusher an orangewood nail stick, gently push back your cuticles. If necessary, grab a cuticle cutter to nip away excess skin. Don't go overboard; you don't want to leave any redness or raw skin. Step 6: Buff the NailsYou're going to want a smooth nail bed for perfect polish application. Step 7: Moisturize and MassageJust because you're not at a salon doesn't mean you can't treat your hands to a relaxing massage. This nourishes hands and helps strengthen nails. For a real salon-style manicure, wrap hands in a hot towel right after and use it to remove excess cream from the nail bed. Wipe each nail down with a cotton swab soaked with nail polish remover before you apply polish. Step 8: Polish Time!Now you're ready for the good stuff! Apply a base coat, then two coats of nail polish, and finish it off with a quick-dry top coat. Apply polish in thin layers and let each one dry for a few moments before adding another coat. Sit back, relax, and wait for your polish to dry, at least 30 minutes. Some more tipsStart with sealing the top edge of your nails with polish. When you are painting your nails, run the brush across the edge of your nail first, before polishing the length of the nail to make sure the edge is covered. This is where water can enter, creating a division between the nail plate and polish. Use your thumb to hold down the fat pad of the finger - to have more unencumbered access to the free edge. Do this with base, colour and topcoat. Always apply polish in a cool, breeze-free area. Drafts and heat can make your polish dry unevenly. Wait three to five minutes between coats to ensure nails are fully dry. |
|
10 Nail Polish Mistakes We All Make And How to Prevent Them!
It takes more than a gorgeous nail polish colour to get a flawless manicure, and it's safe to say we've all had the experience of completely messing up a manicure-often within mere minutes of finishing the last coat of polish. The truth is, you don't need to be a professional manicurist to do a great job painting your nails, but you do need to watch out for some common nail polish mistakes-from using old polish to doing your nails right before bedtime. We all make these mistakes, so you're not alone!
Here are the 10 most common nail polish mistakes, and how to prevent them.
- Taking a hot shower right after applying polish.
Never shower immediately after a manicure - you probably haven't give the polish enough time to set in. But a hot shower? That's even worse. Exposing it to the heat and steam of the shower can cause the nail polish to bubble or smudge.It's best to wait a full hour after the manicure is done before showering.
- Going to bed right after applying polish.
Although it appears that nails have dried within 20-30 minutes, it actually takes a full 24 hours for nail polish to fully dry. A super easy trick to help the drying process along is to wait a minute or two for your polish to start setting up, then run very cold water over your hands. Let the water run down over your nails for about 3 minutes. The cold water helps the polish set up faster. Be careful to not to run the water directly on the nails as the force of the water may cause the polish to smudge.
- Skipping the top coat.
Skipping a topcoat not only cuts down on the shiny finish of the manicure but it also shortens the longevity of the manicure. It is recommended to apply an additional layer of topcoat every other day for an even longer lifespan.
- Skipping the base coat.
Who hasn't skipped the base coat at least once, okay maybe twice? The basecoat smoothes the surface of the nail for a flawless finish, improves adhesion of the polish to the nail plate, and prevents the pigments in the nail polish from staining the natural nail. No yellow nails here! It's an extra step, but totally worth it.
- Applying thick coats of colour.
To compensate for the colour looking lighter than in the bottle, we paint on thick coats of colour. But in this case, patience really is key. When we apply colour in thick layers the polish takes much longer to dry; the longer it takes to dry the more likely we are to smudge the manicure. Instead apply thin, even coats and wait two minutes in between. The polish will actually dry faster. Also, if you apply a heavy coat of polish, it's much more likely to flow into the cuticle area which means you'll have to clean up the mess with an orangewood stick and remover.
- Using one stroke to apply polish.
If there is one technique you should take with you from the salon, it's that manicurists use three to four strokes to apply polish to the nail. With one stroke, it's difficult to get the sidewalls (left and right edge of the nail) and cuticle area, making the nails look unfinished. Plus, the colour will grow out in mere days. Apply colour to the nail in three or four strokes, says Candido. "Apply colour to the nail in three or four strokes. Start in the center near the cuticle, swipe down the nail to the right side, return to the starting point and swipe down the nail to the left, then return to the center and swipe down the middle. If there is any uncovered area swipe down the whole nail one more time.
- Starting with greasy nails.
If there's oil on the surface of the nail before the polish is applied, it's much easier for polish to peel - nothing sticks to an oily surface. Instead, wait to apply cuticle oil after the polish and go easy with the lotion. "It's best to use a product like Gelish pH Prep to ensure all surface oil and moisture are eliminated before applying your basecoat. It does this by neutralizing the pH level in the nail to better accept the base coat. Basically, it's like a primer for your nails.
- Using old nail polish.
There is nothing more depressing than saying goodbye to a favorite nail polish. As polish ages the solvents evaporate causing it to thicken and get stringy. This makes applying polish quite difficult. Also, old polish doesn't adhere to the nail as well as fresh polish does. As a rule of thumb, go through your polishes every year and replace anything you didn't buy in the last 12 months.
- Avoiding the whole cuticle area.
If you're not super diligent with keeping your cuticles in check, your manicure will look messy (if you paint over the cuticle) or grown out (if you leave too much space between the polish and the end of the nail). You only need to leave a hairs-width between the polish and the cuticle. To get as close as possible without touching the cuticle, plant the brush on the nail plate near the cuticle and apply light pressure to spread the brush out. Then, lift slightly and push towards the cuticle, stopping at the cuticle without touching it. Then, swipe down the nail turning the brush slightly in your fingers to the left or the right to get along the sidewall (left or right edge of the nail plate).
- Using acetone remover.
Nail polish removers with acetone dehydrate the nail and surrounding cuticle. Repetitive use can cause white spots on the nail as well as splitting at the free edge and drying of the cuticle. Non-acetone remover is a much kinder and gentler choice.
Articles Index Page